Step-by-Step Guide on How to Prepare for an Aircon Replacement: A Friendly Approach
- 338 Aircon
- Jul 7, 2024
- 16 min read

Updated: Oct 2, 2024

Ever wondered how to prepare for an aircon replacement? Replacing your air conditioning unit can be a complex task, but with the right preparation, it can be a breeze. Whether you're dealing with a failing system or upgrading to a more energy-efficient model, being prepared can save you time and money. Understanding the steps to replace your aircon will ensure a smooth and stress-free experience.
Start by clearing the area around your current aircon system. Ensuring proper ventilation and accessibility is crucial for both removing the old unit and installing the new one. Choosing the right spot for the outdoor unit is equally important; it should be level, stable, and free from obstructions.
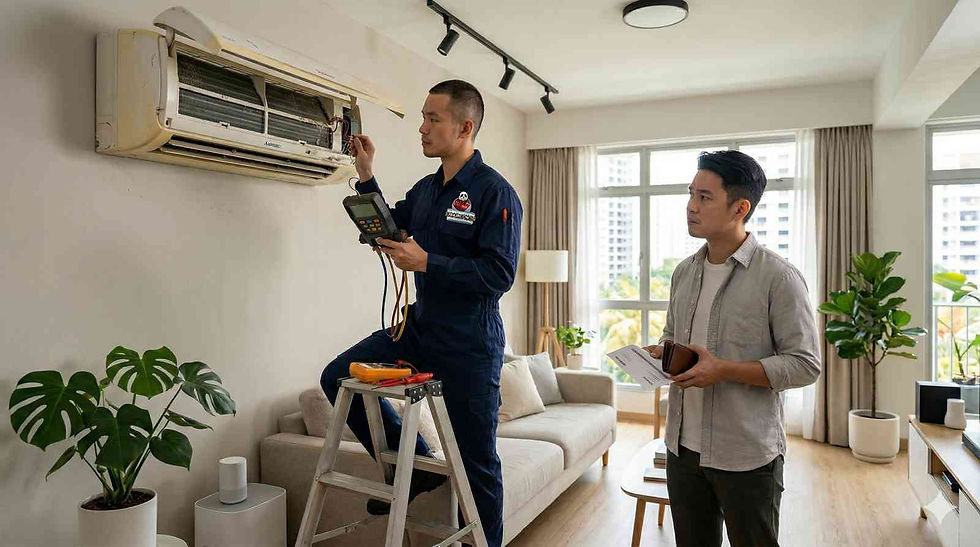
Next, consider whether you will handle the installation yourself or hire a professional. Each approach has its own set of advantages. Professionals bring expertise, while DIY can be more cost-effective but requires more effort and knowledge on your part.
Key Takeaways
Proper planning can save time and money
Clear and prepare the installation site
Decide between DIY or hiring a professional
Understanding How to Prepare for an Aircon Replacement
It's essential to know when to replace your air conditioner and the options available. This guide will help you identify the signs that you need a new AC and explain the different types you can consider installing.
Signs You Need a New Air Conditioner
Your AC might be signaling that it's time for a replacement through various signs. If your unit is more than 10-15 years old, it's often more cost-effective to replace it rather than repair it.
Another sign is an increase in your energy bills. Older aircon units tend to work harder to cool your space, leading to higher electricity costs. Frequent repairs and unusual noises can also indicate that your AC is on its last legs.
If your home has uneven temperatures or the unit doesn't seem to cool as effectively as it used to, these are signs that your air conditioner may be losing its efficiency. Additionally, if you notice excessive humidity inside your home, it could mean your AC isn't functioning correctly.
Types of Air Conditioners
There are several types of air conditioners to choose from, each with its own benefits. Central air conditioners are suitable for cooling large homes through a duct system and provide even temperature control.
Split air conditioners consist of an indoor and an outdoor unit and are ideal for cooling individual rooms or small spaces. They are energy-efficient and quiet.
Window units are a budget-friendly option for cooling single rooms. They are easy to install but can be noisy.
Portable air conditioners offer flexibility as they can be moved from room to room. They're perfect for renters or those who need a temporary cooling solution.
Ductless mini-split systems are similar to split air conditioners but do not require ducts. They are efficient and offer zone cooling, meaning you can control the temperature in different parts of your home independently.
Planning Your Replacement
Proper planning ensures you get an aircon that fits your needs and budget. This involves careful budgeting, selecting the right model, and considering the best time for replacement.
Budgeting for Your New Aircon
Start by deciding how much you can spend on a new aircon. Prices can vary based on the type and brand.
Look into both the upfront cost and the long-term costs, such as energy bills and maintenance. You might find it helpful to list potential expenses:
Expense | Estimated Cost |
Purchase Price | $500 - $3000 |
Installation Fees | $200 - $1000 |
Energy Costs | Varies by efficiency |
Maintenance | $70 - $150 per visit |
Remember, more energy-efficient models might be pricier but save money over time.
Choosing the Right Model
Selecting the perfect aircon means tailoring your choice to your home's needs.
Consider the size of the room and the energy efficiency rating. A BTU (British Thermal Unit) calculator can assist you in understanding what cooling capacity you require. Use this formula to get an estimate:
Room Size (sq ft) | |
up to 250 | 6,000 BTUs |
250-350 | 8,000 BTUs |
350-500 | 10,000 BTUs |
500-700 | 12,000 BTUs |
Consult user reviews and expert recommendations to ensure you choose a model known for reliability.
Timing Your Replacement
Deciding when to replace your aircon can influence cost and convenience.
Plan replacements during off-peak seasons, like spring or fall, when prices and wait times may be lower.
Evaluate your current unit's performance. Signs that you need a replacement include frequent repairs and a decrease in efficiency.
Additionally, look out for rebates or promotions from manufacturers, which often occur during seasonal changes. Timing installation to benefit from sales or incentives can save substantial money.
Preparing for Installation
Getting ready for aircon installation involves finding the right professional aircon installation services, setting up a convenient installation time, and making sure your home is prepared for the unit.
Selecting a Professional Installer
Choosing a reliable installer is crucial. Start by researching local companies with good reputations. Look for reviews and ask for recommendations from friends. Make sure the installer has proper certifications and insurance.
You might want to consider companies like 338 Aircon, which has experience and positive feedback. Ask for quotes from multiple providers, then compare their services and prices. Also, check if they offer warranties. A reliable installer ensures your aircon works efficiently and lasts longer.
Scheduling the Installation
Once you’ve chosen an installer, the next step is scheduling. Pick a date and time that works for both you and the installer. Keep in mind that weekends and holidays may be busier and more expensive.
Plan the installation at a time when you can be home to oversee it. Confirm the appointment a day or two beforehand. This way, you can ensure everything is on track. Make sure to ask the installer how long the installation process will take, so you can schedule your day accordingly.
Preparing Your Home
Before the installation day, prepare your home. Begin by clearing the area where the aircon unit will be placed. Move furniture and any obstacles away to give the installer easy access. This might include moving items off walls or clearing outdoor spaces if applicable.
Place your AC unit away from walls or curtains to prevent their temperature from affecting each other, which can reduce comfort and increase power consumption due to disrupted airflow.
Cover furniture and electronic devices to protect them from dust. If you’re installing a window unit, ensure the window is clean and not damaged. For split systems, make space for both indoor and outdoor units. This preparation makes the installation process smoother and faster.
By following these steps, you’ll be well-prepared for your new aircon installation, ensuring a seamless and efficient setup.
Recommended Products for Aircon Replacement
When it's time to replace your aircon, choosing the right product is key. Here are some top aircon brands and models to consider:
Pros: Energy efficient, quiet operation, and reliable performance.
Cons: Higher upfront cost compared to non-inverter models.
Pros: Advanced filtration system, low noise levels, and sleek design.
Cons: Can be more expensive to repair.
Pros: Features humidity control, nanoe™ X purification, and energy savings.
Cons: Installation can be complex.
Pros: Fast cooling, smart features like Wi-Fi control, and good energy efficiency.
Cons: Limited availability of service centers.
5. Samsung Wind-Free™
Pros: Offers wind-free cooling, stylish design, and fast cooling capabilities.
Cons: Higher maintenance costs.
Comparison Table
Brands/Models | Pros | Cons |
Energy efficient, quiet, reliable | Higher upfront cost | |
Mitsubishi Electric Starmex | Advanced filtration, low noise, sleek design | Expensive repairs |
Panasonic Sky Series | Humidity control, nanoe™ X purification, energy savings | Complex installation |
LG Dual Inverter | Fast cooling, smart features, energy efficiency | Limited service centers |
Samsung Wind-Free™ | Wind-free cooling, stylish design, fast cooling | Higher maintenance costs |
Consider these factors when choosing the right aircon replacement for your needs.
Assembling Your Aircon Replacement Toolkit
To replace your aircon, you need the right tools. Here’s what you’ll need and why they are important.
Essential Tools and Equipment
Screwdrivers (Phillips and flathead)
Function: Removing and installing screws.
Importance: Vital for disassembling and assembling parts .
Wrench Set
Function: Tightening and loosening nuts and bolts.
Importance: Ensures components are secured properly.
Tensioner Tool
Function: Removing and replacing the serpentine belt.
Importance: Crucial for accessing the aircon compressor.
Manifold Gauge Set
Function: Measuring refrigerant pressure.
Importance: Helps in checking the system’s health.
Vacuum Pump
Function: Removing air and moisture from the system.
Importance: Necessary for proper refrigerant flow.
Refrigerant
Function: Cools the air.
Importance: Essential for air conditioning function.
Safety Gear (gloves, goggles)
Function: Protecting yourself from injury.
Importance: Keeps you safe during the work.
Multimeter
Function: Measuring electrical values.
Importance: Useful for diagnosing electrical issues.
Pipe Cutter
Function: Cutting refrigerant lines.
Importance: Needed for installing new connections.
Quick Reference Table
Tool | Function | Importance |
Screwdrivers | Removing/installing screws | Disassembly/assembly |
Wrench Set | Tightening/loosening bolts | Securing components |
Tensioner Tool | Removing serpentine belt | Accessing compressor |
Manifold Gauge Set | Measuring refrigerant pressure | Checking system health |
Vacuum Pump | Removing air/moisture | Proper refrigerant flow |
Refrigerant | Cools the air | Essential for function |
Safety Gear | Protecting yourself | Ensures safety |
Multimeter | Measuring electrical values | Diagnosing issues |
Pipe Cutter | Cutting lines | Installing new connections |
Make sure you have all these tools and equipment ready before starting your aircon replacement. This will help you complete the job smoothly and safely.
The Replacement Process
Replacing an air conditioner involves a series of clear steps that ensure the new unit works efficiently. You'll first remove the old unit, then install the new one, and finally, test the system to confirm everything is set up correctly. Here’s what you need to know about each step.
Removing the Old Unit
Removing the old aircon unit is crucial and requires care. First, turn off the power supply to your air conditioner. This ensures safety during the procedure. Next, disconnect the refrigerant lines. These lines need to be handled by a professional because they contain chemicals that require proper disposal.
Then, remove the electrical wiring connected to the unit. Label the wires so that reconnecting them to the new unit is more straightforward. Finally, loosen the bolts and brackets holding the air conditioner in place. Carefully remove the unit and set it aside. Ensure that the area is clean and free of debris before proceeding with the installation of the new aircon.
Installing the New Aircon
Begin installing the new air conditioner by positioning it in the proper location. Ensure it is level to prevent any water leakage after installation. Connect the mounting brackets or bolts securely. This step ensures the unit stays in place and operates without any issues.
Proceed to connect the refrigerant lines, making sure they are sealed tightly. Any leaks can cause inefficiencies or damage to the system. Next, reattach the electrical wiring, using the labels you applied earlier for reference. Double-check all connections to make sure they are secure and correct.
Finally, attach the drainage pipe to handle the condensation. Make sure it is properly connected to avoid water damage. Once all these connections are in place, your aircon is ready for testing.
Testing the New System
After the installation, the next vital step is testing the new aircon unit. Turn the power supply back on and start the unit. Listen for any unusual noises that could indicate a problem. Check the airflow from the vents to ensure it is strong and consistent. Avoid placing your AC near north-facing windows to prevent cold air from accumulating in corners, which can impact room comfort.
Use a thermometer to measure the temperature of the air coming from the unit. It should cool down within a few minutes. Also, inspect the refrigerant lines and drainage pipe for any leaks or issues. If everything is running smoothly, your new aircon is successfully installed. Periodically check the system over the next few days to confirm all is well.
Following these steps ensures that your aircon replacement process is smooth and successful.
Hiring a Professional vs DIY
When you need to replace your air conditioner, you might wonder if you should do it yourself or hire a professional. Let's look at the benefits and drawbacks of each approach.
Hiring a Professional:
Benefits:
Expertise: Professionals have the skills and experience to install your aircon correctly.
Warranty Protection: Hiring a licensed installer may keep your warranty valid.
Less Stress: You avoid handling heavy equipment and complex installation steps.
Drawbacks:
Cost: Professional installation can be more expensive.
Scheduling: You might need to wait for an available appointment.
DIY Installation:
Benefits:
Cost Savings: Doing it yourself can save money on labor costs.
Control: You control the timing and pace of the project.
Drawbacks:
Skill Required: Aircon replacement requires technical know-how. Mistakes can be costly.
Safety Risks: Handling electrical components and refrigerants can be dangerous.
Safety Pointers:
Wear Protective Gear: Always wear gloves and safety glasses.
Turn Off Power: Make sure to disconnect electricity before working on the aircon.
Follow Instructions: Carefully follow the installation manual and local codes.
Whether you choose to hire a professional or go the DIY route, understanding these factors will help you make the best decision for your aircon replacement.
Maintaining Your New Aircon
Regular maintenance and professional servicing keep your aircon running efficiently, extending its
lifespan. This guide provides essential tips to maintain your new aircon.
Routine Maintenance Tips
Regular maintenance is essential for peak performance. Clean or replace the air filters every 1-2 months. Dirty filters can block airflow, reducing efficiency and causing your unit to work harder.
Check the aircon's fins. If bent, they can block airflow. Use a fin comb to straighten them. Keep the area around your outdoor unit clean. Remove leaves, dirt, and debris that could clog the system.
Monitor and clean the evaporator and condenser coils at least once a year. Dust and dirt reduce their
ability to absorb and release heat. Clear the condensate drain to prevent clogs leading to moisture problems inside your home.
Professional Servicing Schedule
Even with regular maintenance, getting maintenance from a professional aircon servicing company is crucial. Schedule a professional service every 6 months. A technician will inspect and clean hard-to-reach areas and ensure everything is working correctly.
During servicing, the technician will check refrigerant levels. Low refrigerant can damage your compressor. They'll also inspect electric connections, ensuring safe and efficient operation.
Professional technicians will also lubricate motors and check belts for wear and tear, preventing unexpected breakdowns. Regularly scheduled professional maintenance can help catch minor issues before they become major problems, ensuring your aircon runs smoothly year-round.
A Comprehensive Guide to Aircon Replacement Cost in Singapore
Replacing an air conditioner in Singapore can be a complex and expensive process due to various factors. The cost can range from $3,350 to $5,912 for most households. It's crucial to consider not only the price of the unit but also the additional expenses involved, such as labor and installation fees.
Different types of air conditioning unit have different costs. Central air conditioning systems usually cost more than portable or window units. Labor costs for HVAC system installation can also drive up the total price significantly.
You also have to think about extra costs like copper piping and other materials required for the installation. Understanding these factors will help you make an informed decision and potentially save money in the long run for your ac system.
Understanding Aircon Replacement Cost
Replacing an air conditioning system in Singapore involves considering several factors, including the type of unit and additional expenses such as installation and labor costs. Making an informed decision requires understanding what these costs entail and how they can vary.
Types of Air Conditioners
In Singapore, you have several types of air conditioners to choose from. A central ac unit is usually the most expensive. These systems are excellent for cooling large spaces but come with higher installation fees due to the extensive ductwork required.
Split air conditioners are more common in homes. They consist of an outdoor unit connected to one indoor unit or more. The price varies based on the number of indoor units you need. Portable air conditioners are the least expensive and are ideal for smaller areas or temporary cooling.
Window air conditioners are another option. They are less common but can be an affordable choice for specific applications. Each type comes with its own set-up and maintenance costs, making it crucial to choose the one that meets your needs and budget.
Cost Factors
Several factors influence the total cost of replacing an air conditioner. The cost of the unit itself is the most significant expense. For instance, a PRISM+ Zero smart air conditioner can cost around $1,250 per unit.
Installation fees can add significantly to your overall aircon replacement cost. Basic installation for split systems starts at about $200 but can go up to $1,450 for more complex setups in larger areas, as noted by Megafurniture.
Labor costs also play a role. For example, Econcool states that the average household spends around $4,631 on labor and setup.
Finally, consider maintenance costs. You may sometimes need to replace components like compressors or fan coils, which can add to the initial cost. Regular servicing ensures efficient operation and longevity, adding another layer to your budget planning.
Estimating the Price Range for AC Replacement
When thinking about replacing your air conditioner in Singapore, the cost will mostly depend on the type and model of the AC unit you choose. Different needs and preferences will determine whether you go for a basic, mid-range, or high-efficiency model.
Basic Models
Basic models of air conditioners are usually the most affordable. These units are great for small spaces or those on a budget. A single split air conditioner can start from around $200 for the installation, but the unit itself typically runs between $800 to $1,200.
These models are simple, often focusing only on cooling without additional features. You might find them in small apartments or single rooms that don’t require large cooling capacities. While they get the job done, they may not be as energy-efficient, which can lead to higher electricity bills over time.
Mid-Range Models
Mid-range models balance affordability and efficiency. These units start from $1,500 and can go up to $3,000 for more advanced models, including the cost of installation. System 2 split air conditioners, which can cool two rooms, usually fall into this category.
These units come with better energy efficiency and some additional features like remote control, better filters, and quieter operation. They are a good choice for medium-sized homes or apartments where moderate cooling is required. With improved energy efficiency, you may also notice lower electricity costs compared to basic models.
High-Efficiency Models
High-efficiency models are the premium choice and come with the latest features and technologies. These units generally start from $3,000 and can exceed $6,000. They often come with inverter technology, which adjusts the cooling power to maintain a steady temperature, thus saving energy.
These advanced units might include smart control options, allowing you to control the AC through your phone. They are suitable for larger homes or those looking for the best in comfort and efficiency. High-efficiency models can significantly reduce your monthly electricity bill due to their superior energy-saving capabilities.
When choosing an air conditioner, consider the long-term benefits such as energy savings and comfort in addition to the initial cost. For more details, check out guides from Dollars and Sense. These resources can provide more specific advice tailored to your needs.
Labor Costs and Installation
Labor costs and installation fees for replacing an air conditioner in Singapore vary greatly based on factors such as room size and the type of air conditioner. Professional installation offers reliability but comes with higher costs, while DIY approaches may save money on the final cost.
Professional Installation
Professional installation of an air conditioner ensures proper setup and efficient operation. The costs can range significantly, starting from around S$200 for smaller units in bedrooms to as high as S$1,450 for complex setups involving multiple units.
Hiring experienced installers is important. They ensure that the air conditioner is placed correctly, connected securely, and tested for optimal performance. While hiring professionals adds to the cost, it often results in long-term savings through increased efficiency and reduced repair needs.
Different installation companies might charge different rates, so it’s a good idea to get multiple quotes. Keep in mind that professional installation often includes warranties and after-installation service, adding value to the investment.
Do-It-Yourself Considerations
If you’re handy and willing to learn, installing an air conditioner yourself might save you some money. DIY installation eliminates labor fees, but you need the right tools and basic knowledge of electrical systems.
Before deciding on a DIY approach, consider the complexity of the task. Installing a central air system or a multi-unit split system can be challenging without professional expertise. Improper installation can lead to inefficiencies, higher energy bills, and even safety hazards.
Portable or window-type air conditioners are easier for DIY projects. Detailed installation guides are usually available. Still, consult the manufacturer’s guidelines to ensure everything is done correctly.
Weigh the cost savings benefits of doing it yourself with the potential risks and difficulties involved. Sometimes, investing in professional help is worth avoiding future problems and ensuring a smooth setup.
Additional Expenses to Consider
When replacing an air conditioner in Singapore, there are a few extra costs beyond the ac unit cost itself. These can include permits, fees, and potential ductwork modifications.
Permits and Fees
When installing a new air conditioner, you'll need to consider the various permits and fees. The local government may require permits for electrical work and other aspects of HVAC installation.
Why are permits important? They ensure that the work meets safety and building standards, reducing risks like electrical fires. Permit costs can vary but are typically a few hundred dollars.
You might also face fees for inspections to verify that the work is done correctly. Be sure to check with your contractor about which permits and fees are needed for your specific case.
Ductwork Modifications
If you have an existing duct system, it may need modifications to work with the new unit. This could include resizing ducts, sealing leaks, or adding insulation.
Why is ductwork important? Proper ductwork ensures that your new air conditioner functions efficiently, which can lower your energy bills over time.
Costs for ductwork can add up. A simple modification might be a few hundred dollars, while more extensive changes could run into the thousands.
Discuss this with your HVAC contractor to understand what’s necessary and get an accurate quote.
Saving Money on Your Air Conditioner Replacement
Replacing an air conditioner can be costly, but there are ways to save money, such as taking advantage of rebates, tax credits, and choosing energy-efficient models.
Rebates and Tax Credits
In Singapore, various rebates and tax incentives can help lower the cost of replacing your air conditioner. The government often promotes energy-efficient appliances through rebate programs, which can offset the initial purchase price.
Look for promotions from local utility companies as well. Participating in these programs could save you a significant amount. Simply check with retailers and authorized dealers to see what rebates are available when you purchase a new unit.
Applying for tax credits related to energy efficiency can also reduce your expenses. By filing for these credits, you can get a portion of your investment back during tax season. Make sure to keep all receipts and necessary paperwork organized for filing.
Energy-Efficient Options
Choosing an energy-efficient air conditioner is a smart way to save money in the long run. Modern units with a high SEER (Seasonal Energy Efficiency Ratio) rating use less electricity, which can reduce your monthly utility bills.
Consider these tips:
Smart Thermostats: They adjust cooling based on your preferences, saving up to 10% on energy bills.
Proper Sizing: An air conditioner that is too large or too small will waste energy. Consult with a professional to determine the correct size for your space to achieve optimal air quality.
Energy Star-rated Units: These models meet strict guidelines for energy efficiency set by the government. Investing in one could lower your electricity costs significantly.
If you follow these steps, you will not only save on the replacement cost but also enjoy reduced energy bills over time.
Conclusion
Replacing an aircon unit can seem like a daunting task, but breaking it down into manageable steps helps. You need to gather the right tools and ensure your workspace is clear. Make sure to safely disconnect the old unit and prepare for installation by checking your new unit's specifications.
A highly recommended aircon company to take care of all your aircon needs at an affordable price would be 338 Aircon Singapore as they are known for their fast and efficient service.
Follow each step carefully to avoid mistakes. Ensure your new aircon is installed correctly and works efficiently. If you feel unsure at any point, don't hesitate to seek professional assistance. Aircon professionals can help troubleshoot any challenges and may save you time and effort.
Remember, safety comes first. Always handle electrical components with care and use the correct safety gear. If done properly, a new ac unit can significantly improve your home's comfort.
Taking the time to do it right or getting help when necessary ensures a smooth replacement process.